If you use SAPPHIRE in your research please cite :
@article{wertenbroek2024improving,
  title={Improving population scale statistical phasing with whole-genome sequencing data},
  author={Wertenbroek, Rick and Hofmeister, Robin J and Xenarios, Ioannis and Thoma, Yann and Delaneau, Olivier},
  journal={PLoS genetics},
  volume={20},
  number={7},
  pages={e1011092},
  year={2024},
  publisher={Public Library of Science San Francisco, CA USA}
}
Phase Polishing Toolkit
Improve phased haplotypes with whole genome sequencing reads.
Benchmark phased haplotypes with whole genome sequencing reads.
Written to scale with massive population scale data and run on the UK Biobank research access platform (RAP).
News – Feb. 2025
INDELs are now supported by SAPPHIRE.
New options for long read sequencing technology.
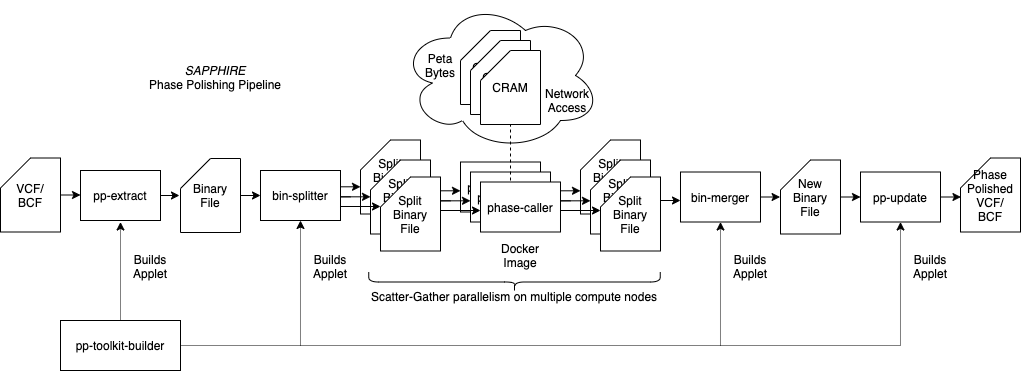
Pipeline Diagram
Directory Structure
bin_tools : Tools to query, split, merge a sparse binary format file for extract heterozygous variants.
diagrams : drawio diagrams.
dnanexus_app : Apps to deploy on the UK Biobank DNANexus RAP, allows to run the tools on the RAP via their interface.
dnanexus_scripts : Scripts to launch jobs on the UK Biobank DNANexus RAP from a computer through the dx-toolkit.
Docker : Dockerfile and scripts to create a docker image for the actual phase polishing on the RAP.
include : Shared headers
phase-caller : Source of the phase-caller that does the actual phase polishing given sparse binary file and CRAM file path
pp_extractor : Source of tool to extract heterozygous variants from VCF/BCF and generate sparse binary format file.
pp_update : Source of tool that updates VCF/BCF file with phase polished heterozygous variants from sparse binary file.
test : Unit and Integration Testing folder.
DNANexus RAP Build instructions
For the DNANexus Research Analysis Platform (RAP) an applet pp-toolkit-builder to build the other applets is provided. This applet can be built locally (requires dx-toolkit) or directly from a “ttyd” instance on the RAP. Once this pp-toolkit-builder applet is built, the others can be built from the RAP interface directly.
Steps to build to PP-toolkit builder and run it to build the applets
Start analysis and select ttyd. Any instance type is acceptable, we recommend mem2_ssd2_v2_x2.
Access the ttyd terminal with the “Open Worker URL” button from the job monitor.
Run the following commands.
git clone https://github.com/rwk-unil/pp.git
cd pp
dx build dnanexus_app/pp-toolkit-builder
Check that the pp-toolkit-builder applet appeared in your output folder on the RAP.
You can now terminate the ttyd job.
Launch the pp-toolkit-builder applet by double clicking on it.
Select an output folder for the applets and launch the job.
Once finished (build time should be less than 10min) the applets will be available in the chosen output folder.
Build and upload the docker image
cd Docker
wget https://github.com/rwk-unil/pp/releases/download/prelim/hts-ref.zip
docker build -t pp-toolkit:v1.4 -f Dockerfile_fat2
docker save pp-toolkit:v1.4 | pigz --fast > pp_toolkit_v1.4.tar.gz
Note, if you don’t have pigz you can use gzip but it will take more time
docker save pp-toolkit:v1.4 | gzip > pp_toolkit_v1.4.tar.gz
Upload the pp_toolkit_v1.4.tar.gz to you project on DNANexus e.g., under a docker directory.
Running the pipeline
The pipeline diagram above presents a general overview of the different tasks.
To illustrate with an example let’s assume we want to polish a file named chr20.bcf previously phased with SHAPEIT5.
The pp-extract-applet applet takes a VCF or BCF file that has been phased with SHAPEIT5 and outputs three files, a text file with the sample names, a BCF file with variants only, and a sparse binary file with the extracted heterozygous variant sites. We recommend choosing an output folder like SAPPHIRE/step1_extraction/chr20/. For extremely big input files (e.g., hundreds of thousands of samples) we recommend to launch the job with high priority so that it is not interrupted and relaunched. Choose an instance type with enough storage to be able to hold the input VCF/BCF file.
(Optional) If the input file has more than a thousand samples we recommend splitting the binary files so that the phase calling can be done on multiple compute nodes. The tool for this is bin-splitter-applet. This applet takes the binary file generated in the previous step and splits it into binary files of 1000 samples (this number can be changed as an option of the applot). We recommend outputting to a folder like SAPPHIRE/step2_splitting/chr20/. This is a very fast step and takes less than a few minutes.
The phase calling software should be run as a Docker image (see above to build). The script to launch it from a host with the dx-toolkit software (or from a ttyd instance, can be terminated once launched) is dnanexus_scripts/run_phase_caller.sh or dnanexus_scripts/run_phase_caller_batch.ch to launch all the jobs for the split binary files. This should be run with the following options :
The --project-id <PROJECT ID> is the number after the sample ID on the CRAM files. E.g., project-xxxyyyzzz1234567890abcde:/Bulk/Whole genome sequences/Whole genome CRAM files/10/1000580_12345_0_0.cram here represented by 12345 so the option would be --project-id 12345, this is required so that the software can generate the CRAM file name from the sample list.
The --destination <folder> is the destination folder for the outputs, e.g., SAPPHIRE/step3_phase/chr20/
The --vcf-id is the ID of the BCF file generated by the pp-extract-applet (e.g., SAPPHIRE/step1_extraction/chr20/chr20.bcf_vars.bcf), it can be copied from the file manager information tab in the DNANexus RAP.
The bin-id is the file ID of the binary file generated by the pp-extract-applet (e.g., SAPPHIRE/step1_extraction/chr20/chr20.bcf_hets.bin), pass the file ID of this file.
The samples-id is the file ID of the sample list text file generated by the pp-extract-applet (e.g., SAPPHIRE/step1_extraction/chr20/chr20.bcf.samples.txt), pass the file ID of this file.
Optional options are :
--cram-path if the CRAM path differs from /mnt/project/Bulk/Whole genome sequences/Whole genome CRAM files (/mnt/project is the mount point for the project files in the docker containers). CRAM filenames are created from sample IDs and project ID e.g., for sample 1234567 from project abcdef, the cram file <cram-path>/12/1234567_abcdef_0_0.cram will be loaded. This is specific to the UKB RAP.
--samples-list-id if only a subset of the samples need to be rephased, this is the file ID of a subset list.
--threads the number of threads to use, because the CRAM files are accessed over the network we recommend to use more threads than cores in the instance type, by default this is set to 12 because it works well for the default mem2_ssd1_v2_x4 instance. We recommend to set this to three times the cores of the instance used (this can be fine tuned by looking at the CPU usage in the logs).
--instance allows to chose another instance type (should not be necessary), default is mem2_ssd1_v2_x4.
important--docker-image if your docker image is named or located different than docker/pp_toolkit_v1.4.tar.gz in your DNANexus project you can provide it here.
If the binary file has been split the following script is used instead :
The options are the same with the difference that this script will generate a job for all file in the same directory as the file defined by --bin-id, so this can be any of the split binary files. For example if 200,031 samples are split into 201 binary files of up to 1,000 samples per file, this will generate 201 jobs. The script will ask for confirmation before launching all the jobs. run_phase_caller_batch.sh has an extra option --tag that allows to tag the jobs.
Note, the phase caller is run as a Docker image on a swiss-army-knife type instance because the applet crashes on network errors, the Docker does not and the phase_caller program will detect network errors thanks to the checksums of the blocks inside the CRAM files (the only files accessed over network) and retry.
(Optional) If the binary files were split, the bin-merger-applet allows to reassemble them. This has to be run on the “phase called” binary files e.g., in SAPPHIRE/step3_phase/chr20/, select them all. This is very fast step and takes less than a few minutes. Chose an output directory e.g., SAPPHIRE/step4_merge/chr20.
With the final rephasd binary file available, either after step 3) directly or after reassembling in step 4). We can now update the initial VCF/BCF to generate the final output BCF. The pp-update-applet requires the original VCF/BCF file, and the rephased binary file. It will generate a new BCF file with all rephased heterozygous variant sites updated and index it, so the index will also be generated. This can take a long time (because it has to decompress the initial VCF/BCF and compress the new generated BCF file) so run at high priority. The instance type has to have enough storage to accomodate twice the size of the original VCF/BCF at least. Chose an output folder e.g., SAPPHIRE/step5_update/chr20.
The final rephased BCF files are now available and indexed. Congratulations !
Local Build instructions
# Build the SAPPHIRE PP-Toolkit tools
make
Local run instructions
To run the programs locally there is no need to create “applets”, “Docker images” etc. The programs can be run directly, you get the options by running the programs with the -h flag.
For an example on running SAPPHIRE locally have a look at Rephasing.md where we rephase all genotypes with an allele frequency of less than 0.01 for 3 samples of the 1000 genomes project.
Note for CRAM names for local run
You can pass the path to the CRAM files in the sample file to the phase_caller with the option --cram-path-from-samples-files.
This allows to use a sample list that instead of containing only the sample ID, allows to enter three parameters :
<index in bin file>,<sample name>,<path to individual CRAM file>
So for example for a VCF/BCF with samples HG001, HG002, HG003, HG004 that got extracted to a binary file, and you are interested in phase calling only HG002 and HG004 with CRAM files that don’t follow the UKB naming convention you can use a sample list as :
Then fill the CRAM paths by replacing CRAM_PATH by the correct path for each sample.
Long read support
SAPPHIRE is compatible with long read technology. As the default settings of the phase caller are best suited for short reads, if you run SAPPHIRE with long reads, please pass the following parameters to the phase_caller program.
# Disable the per-base quality filter.# Non-matching bases will be ignored by default.# As a consensus phase call vote is performed,# the chance of a spurious base call affecting phase is extremely low.
--min-baseq 0
# Set the distance threshold to 100 kilo-bases.# The phase caller will consider variants 100kb before and after the# current genotype being rephased.
--max-distance 100000
More information on the options is available in the phase caller help menu:
./phase_caller -h

...

  --min-mapq INT              Caller: Minimum MAPQ score to consider read for phase calling (default 50)
  --min-baseq INT             Caller: Mininum QV score to consider a base in a read for phase calling (default 30)
  --no-filter                 Caller: Don't filter reads, consider them all for phase calling
  --max-distance UINT         Caller: Maximum distance to look back and forth for rephasing (default 1000 bp)
                                  Set this to your library max fragment size / 2
                                  1000 bp is ok for most short-read libraries
This Tailwind CSS plugin enables the use of ARIA attributes (aria-expanded, aria-hidden) as variants in your Tailwind CSS project. It allows you to style elements conditionally based on their ARIA attribute values, directly within your Tailwind utility classes.
Features
ARIA Attribute Variants: Supports aria-expanded and aria-hidden attributes.
Group and Peer Variants: Extends Tailwind’s group and peer variants to conditionally apply styles based on the presence of ARIA attributes in parent or sibling components.
Installation
To install the plugin, add it to your project using npm or yarn:
npm install --save tailwindcss-aria
# or
yarn add tailwindcss-aria
Usage
First, require the plugin in your tailwind.config.js file:
You can use the ARIA variants like any other Tailwind variant. Here are some examples:
<divclass="aria-expanded:text-blue-500">This text turns blue when expanded.</div><divclass="aria-hidden:opacity-50">This element is semi-transparent when hidden.</div>
Group and Peer Variants
Group and peer variants work with ARIA attributes to style elements based on the state of their parent or sibling components.
<divclass="group" aria-expanded="true"><pclass="group:aria-expanded:text-bold">This text is bold when the parent is expanded.</p></div><divclass="peer" aria-hidden="true"><pclass="peer:aria-hidden:text-italic">This text is italic when the preceding sibling is hidden.</p></div>
License
This project is licensed under the MIT License.
Contributing
Contributions are welcome. Please open an issue or submit a pull request with your suggestions.
Important Note:Create ML is not available for the iOS SDK. It can only be used on macOS to train models and is not intended for on-device training. Instead, it is used to train models with data (which may take minutes to hours depending on computing power, size of dataset, and model). When the model is trained, a .mlmodel file can be exported and implemented in iOS/tvOS/watchOS/macOS apps using Core ML.
⚙️ Models
The following models are available as example Playgrounds:
Note: Some of these are incomplete and are currently being added. The goal is to eventually have comprehensive example playgrounds for each model type in Create ML, including sample data and explanations. See Project #1 to track the progress of these playgrounds.
📝 Usage
The easiest way to begin using ClassifierKit is to clone it directly onto your computer.
Navigate to the desired directory on your local filesystem.
Begin! The Playgrounds folder contains Swift Playgrounds for the many models contained within Create ML that will allow you to set parameters and begin training the models, either with the provided sample data or your own data.
This is a simple script to listen to MQTT messages and store them into a JSONL file. This JSONL file can then be replayed at a later date, which is useful for testing MQTT systems.
I had a quick look on the Internet and could not see anything similar, though it likely exists, this just helps me at the moment.
Installation
TODO: Fix this when I understand how to package things properly
This is a python3 script, if that does not match your requirements, please look elsewhere.
This is my first python code, so I have not created an account with PyPI or whatever, so you need to install from this dist
install it
pip install -r requirements.txt
pip install -e .
This will make the script mqtt2jsonl available either in the virtualenv you are running in or your complete environment
If you want to make changes and rebuild, remember to update the version number in the pyproject.toml file.
Using it
Assumption that you are using linux/unix otherwise prefix the command with python3, assuming your other OS has python3 installed and its accessible from a command prompt.
Help is available
./mqtt2jsonl -h
usage: mqtt2jsonl [-h] [-v] [-f] [-j JSONL] [-s SERVER] [-p PORT] [-t TOPIC] [-d DELAY] cmd

Either record or replay MQTT via a JSONL file

positional arguments:
  cmd                   Command to perform against the MQTT topic queue, 'record' or 'replay'

options:
  -h, --help            show this help message and exit
  -v, --verbose         Increase level of logging from WARNING to INFO
  -f, --force           Force overwrite when destination file already exists
  -j JSONL, --jsonl JSONL
                        JSONL file to read from or write to
  -s SERVER, --server SERVER
                        MQTT server name/ip to connect to (localhost)
  -p PORT, --port PORT  MQTT port to connect to (1883)
  -t TOPIC, --topic TOPIC
                        MQTT topic queue to listen to (for recording), usual wildcards apply (default everying as '#')
  -d DELAY, --delay DELAY
                        For replay, override the recorded delay between messages to use an artifical
                        value in msecs, 0 means use record value
Record
Connect to default localhost port 1883, with a wildcard topic, overwriting any previous file
./mqtt2jsonl -j /tmp/record.jsonl record -t 'some_topic/#' -f
Connect to to named server and port, use default topic of everything (#)
./mqtt2jsonl -j /tmp/record.jsonl record --server some_mqtt_server --port 1000
Replay
Connect to default localhost port 1883, replay at the recorded rate
./mqtt2jsonl -j /tmp/record.jsonl replay
Connect to to named server and port, replay at a fast rate of one message per 5ms
./mqtt2jsonl -j /tmp/record.jsonl record --server some_mqtt_server --port 1000 --delay=5
Improvements / TODO
There are a few things that could possibly make this a better more general tool but I don’t need these features right now
A Discord cog for creating user game lists, finding game list intersections, and some more stuff.
Installation
Add this repo to your bot with [p]repo add collective https://github.com/TheCogCollective/Discord_Game_Library
Install the library cog with [p]cog install collective gamelib (this may take a minute)
Finally, load the cog with [p]load gamelib
Updates
You can first check for cog updates by running [p]cog checkforupdates. If available, you can specifically update the library cog by running [p]cog update gamelib.
Usage
All the following commands need to be prefixed with ‘[p]game’. For example, if you want to manually add a game to your library with a ‘!’ prefix, use:
!game add (game_name)
Steam:
steamkey – Sets the Steam API key for the bot (one-time setup; required to use the steamsync and update commands).
Visit the Steam Web API Key page, login with your Steam profile and fill out the short form to generate one – you can use any domain to do so.
steamsync – Syncs games between the given Steam ID and the user’s library.
update – Updates a user’s game library from their synced Steam profile (for new games and accidental deletions!).
Non-Steam:
add – Adds a game to a user’s library.
Suggestions:
suggest – Looks at the libraries of online users and displays all the common games (priority order: voice > online users)
poll – Same as suggest, but instead creates a Strawpoll for users to vote on a game to play.
Deletions:
remove – Removes a game from a user’s library (the update command will re-add all Steam games).
destroy – Deletes the author user’s library.
Library:
list – Prints out a user’s entire game library.
check – Checks for a game in a user’s library, or for all online users in the server.
The Attendance Management System is a Java-based application designed to automate the process of recording and managing attendance for various courses. It provides functionalities for creating courses, adding attendance records, and generating attendance reports.
Author
Arda Baran
Description
The Attendance Management System facilitates efficient attendance tracking, enabling better decision-making and resource allocation based on attendance data
Features
-Course Management: Allows users to create new courses with options to specify whether attendance is mandatory or not, along with the credit hours.
-Attendance Recording: Enables users to add attendance records for each course, including details such as the week number, date, day, status (Present/Absent/Cancelled/Holiday), and duration.
-Attendance Reporting: Provides comprehensive attendance reports for individual courses, displaying total present hours, absent hours, cancelled hours, national holiday hours, and the attendance rate.
-User-Friendly Interface: Utilizes a command-line interface (CLI) with intuitive commands for easy navigation and interaction.
-Data Persistence: Supports data persistence by storing attendance records in files, allowing users to retrieve and review attendance information even after the application is closed.
-This Attendance Management System aims to streamline attendance monitoring processes for educational institutions, training programs, and other organizations. It promotes efficiency, accuracy, and transparency
Technologies And Data Structures Used
-Java
-ArrayList
-Linked List
-Object Oriented Programming
-file organization
-Enum
-LocalDate
-Command Line Interface
-BufferedWriter
-FileWriter
-IOException
-DateTimeFormatter
Usage
-Clone the repository to your local machine using Git.
-Navigate to the project directory and compile the Java application.
-Execute the compiled Java application
-Once the application is running, follow the instructions provided in the command-line interface (CLI) to perform various actions such as adding attendance records or generating attendance reports.
-When prompted, provide input such as course names, attendance details, or commands like “add” or “report” to interact with the system.
-After providing input, review the output displayed by the application, which includes attendance reports or confirmation messages.
-To exit the application, use the “exit” command or press Ctrl+C in the terminal.
File Structure
src/: Contains the Java source code
resources/: txt file (e.g., ADA 407attendance.txt)
$di->set('mail', function () use ($config, $di) {
//setup$mailer = new \Baka\Mail\Manager($config->email->toArray());
return$mailer->createMessage();
});
Sending a normal email()
  $this->mail
    ->to('info@domain.do')
    ->subject('Test Normal Email queue')
    ->content('normal email send via queue')
    ->send();
];
Sending a template normal email()
  $this->mail
    ->to('info@domain.dom')
    ->subject('Test Template Email queue')
    ->params(['name' => 'test'])
    ->template('email.volt') //you can also use template() default template is email.volt
    ->send();
];
Sending a normal email instantly, without queue()
  $this->mail
    ->to('info@domain.do')
    ->subject('Test Normal Email now')
    ->content('send normal email now')
    ->sendNow();
];
Events
mailer:beforeCreateMessage
mailer:afterCreateMessage
mailer:beforeSend
mailer:afterSend
mailer:beforeAttachFile
mailer:afterAttachFile
Setup CLI
usePhalcon\Cli\Task;
/** * Class LsTask * @description('List directory content', 'The content will be displayed in the standard output') */class MainTask extends Task
{
useBaka\Mail\JobTrait;
}
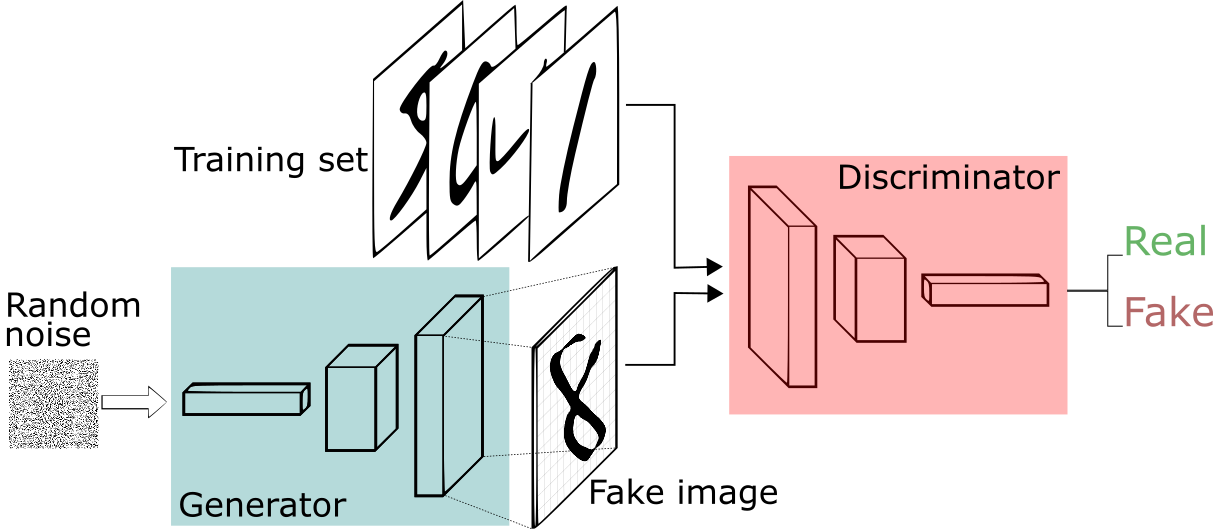
Usually, you want your GAN to produce a wide variety of outputs. You want, for example, a different face for every random input to your face generator.However, if a generator produces an especially plausible output, the generator may learn to produce only that output.
If the generator starts producing the same output (or a small set of outputs) over and over, the discriminator’s best strategy is to learn to always reject that output. But if the next iteration of discriminator gets stuck in a local minimum and doesn’t find the best strategy, then it’s easy for the next generator iteration to find the most plausible output for the current discriminator. Each iteration of generator over-optimizes for a particular discriminator and the discriminator never manages to learn its way out of the trap. As a result, the generators rotate through a small set of output results. This form of GAN failure is called mode collapse.
Approach
Following is the DCGAN architecture we used to reproduce and fix the mode collapse issue.
Generator(
(main): Sequential(
(0) ConvTranspose2d(100, 512, kernel s ize = (4, 4), stride = (1, 1), bias = F alse)
(1) : BatchN orm2d(512, eps = 1e − 05, momentum = 0.1, af f ine = T rue)
(2) : ReLU (inplace = T rue)
(3) : ConvT ranspose2d(512, 256, kernel s ize = (4, 4), stride = (2, 2), padding = (1, 1))
(4) : BatchN orm2d(256, eps = 1e − 05, momentum = 0.1, af f ine = T rue)
(5) : ReLU (inplace = T rue)
(6) : ConvT ranspose2d(256, 128, kernel s ize = (4, 4), stride = (2, 2), padding = (1, 1))
(7) : BatchN orm2d(128, eps = 1e − 05, momentum = 0.1, af f ine = T rue)
(8) : ReLU (inplace = T rue)
(9) : ConvT ranspose2d(128, 64, kernel s ize = (4, 4), stride = (2, 2), padding = (1, 1))
(10) : BatchN orm2d(64, eps = 1e − 05, momentum = 0.1, af f ine = T rue)
(11) : ReLU (inplace = T rue)
(12) : ConvT ranspose2d(64, 1, kernel s ize = (4, 4), stride = (2, 2), padding = (1, 1))
(13) : T anh()
))

Discriminator(
(main) : Sequential(
(0) : Conv2d(1, 64, kernel s ize = (4, 4), stride = (2, 2), padding = (1, 1))
(1) : LeakyReLU (negative s lope = 0.2, inplace = T rue)
(2) : Conv2d(64, 128, kernel s ize = (4, 4), stride = (2, 2), padding = (1, 1))
(3) : BatchN orm2d(128, eps = 1e − 05, momentum = 0.1, af f ine = T rue)
(4) : LeakyReLU (negative s lope = 0.2, inplace = T rue)
(5) : Conv2d(128, 256, kernel s ize = (4, 4), stride = (2, 2), padding = (1, 1))
(6) : BatchN orm2d(256, eps = 1e − 05, momentum = 0.1, af f ine = T rue)
(7) : LeakyReLU (negative s lope = 0.2, inplace = T rue)
(8) : Conv2d(256, 512, kernel s ize = (4, 4), stride = (2, 2), padding = (1, 1))
(9) : BatchN orm2d(512, eps = 1e − 05, momentum = 0.1, af f ine = T rue)
(10) : LeakyReLU (negative s lope = 0.2, inplace = T rue)
(11) : Conv2d(512, 1, kernel s ize = (4, 4), stride = (1, 1))
(12) : Sigmoid()
))
Below are the set of hyperparameters used to train the DCGAN.
BatchSize = 64
ImageSize = 64
nz = 100 # dimension of latent vector z
ngf = 64 # number of filters in generator
ndf = 64 # number of filters in discriminator
niter = 70 # number of epochs
lr = 0.0002 # learning rate
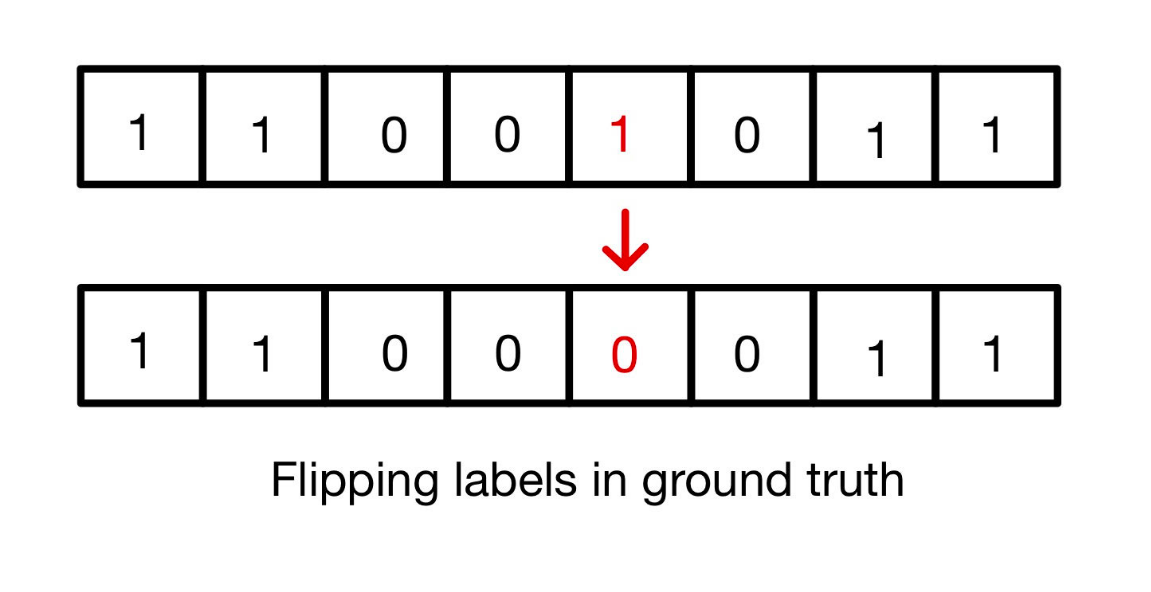
Notice that the number of features used by the Discriminator are too less (on the basis of which it makes a prediction). Generally, the generator exploits these features and produces a gibberish output which fools the discriminator to believe that it is a real image. Thus to avoid overfitting the discriminator, we added a noisy label. We did this by flipping a certain percentage of labels being fed to the discriminator as the ground truth. This avoids overfitting and ultimately prevents mode collapse.
Results
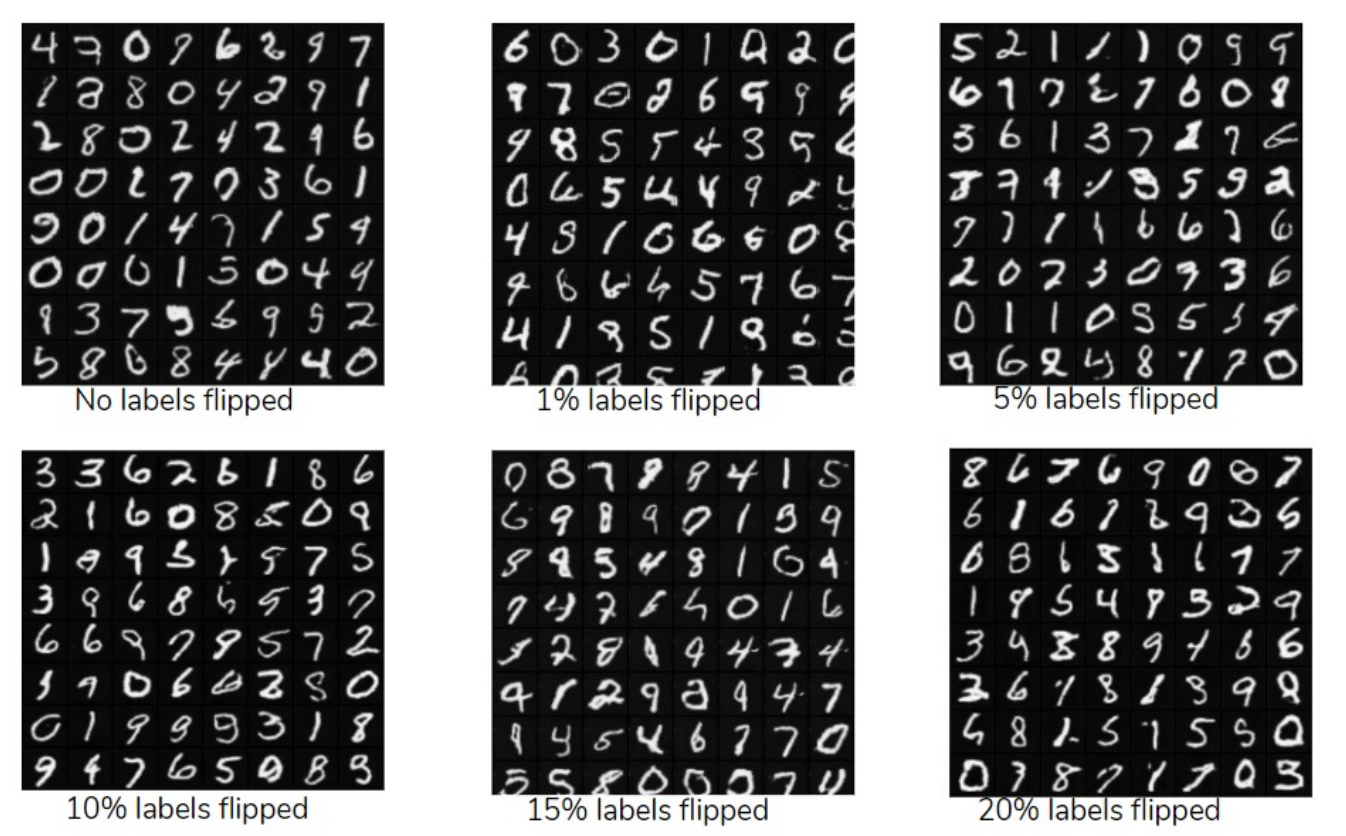
We tried 6 experiments on MNIST dataset with erroneous components in the discriminator.
All experiments were repeated 5 times and the average result was considered to determine at which epoch did the mode collapse.
Percentage error
Epochs for mode collapse
0%
13
1%
15
5%
25
10%
70+
15%
70+
20%
70+
The quality of generated images for all the 6 experiments were comparable and the only noticeable change was the number of epochs it took for mode to collapse.


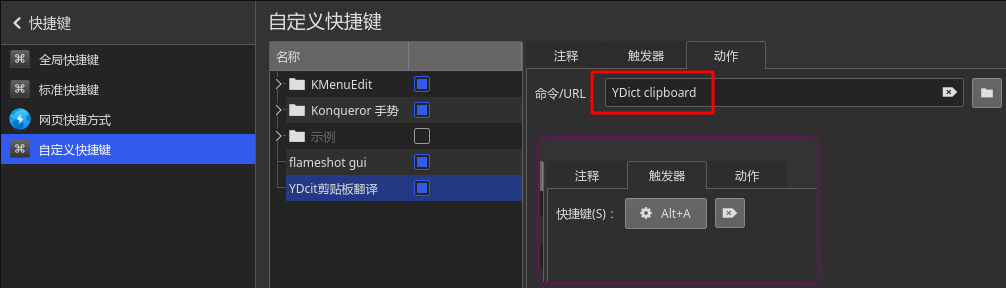
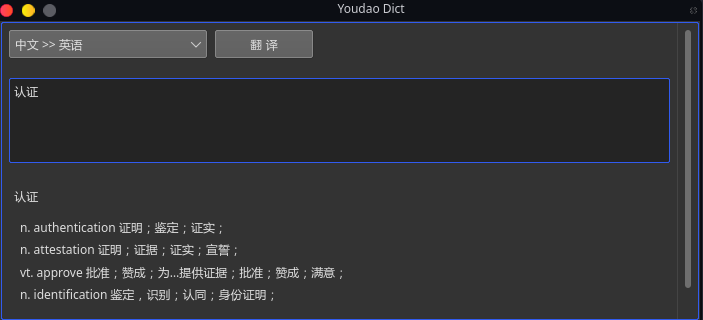
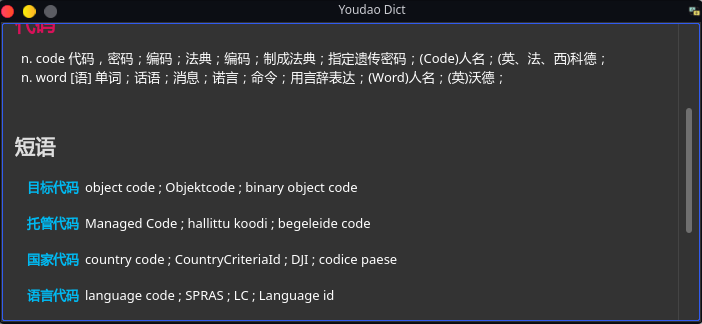
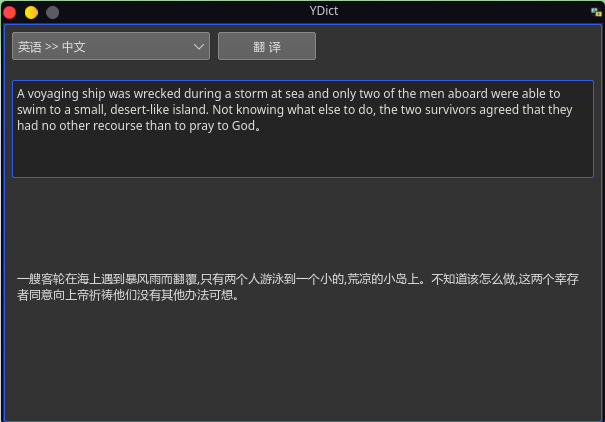
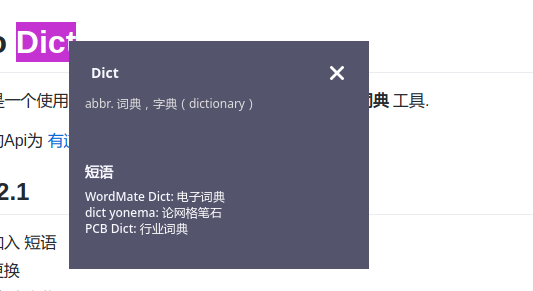
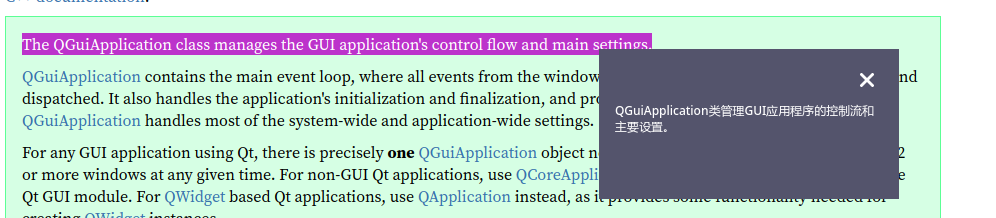


 https://github.com/DreamSaddle/youdao-dict