Author: 7szni7bjkhrb

  • Curso-Shell-Script-Profissional-mod-2

    Curso Shell Script profissional: Do básico ao avançado – Módulo 2: Introdução ao Shell Script.

    Material complementar do curso Shell Script profissional: Do básico ao avançado. Disponível no Youtube.

    Introdução ao Shell Script: O interpretador de comandos do linux permite a execução de sequências de comandos inseridos diretamente na linha de comandos (“prompt”) ou ainda lidos de arquivos de scripts executáveis escritos na linguagem de programação shell script.

    Neste segundo módulo você irá aprender o básico da criação de scripts no shell e as principais estruturas lógicas utilizadas: Condicionais, laços de repetição, case e etc. Este módulo possui também vários exercícios práticos e material de apoio disponível para download no Github.

    Índice

    Este material de apoio está em manutenção, alguns recursos ainda não estão disponíveis.

    Fase 1

    Fase 2

    Fase 3

    Mod.2 #8 - Bloco if (Parte 1): Introdução às estruturas condicionais
    Mod.2 #9 - Bloco if (Parte 2): Comparação de strings
    Mod.2 #10 - Bloco if (Parte 3): Comparação numérica
    Mod.2 #11 - If, elif, else : Bloc if com múltiplas condicionais
    

    Fase 4 Total 3 aulas (00:28 horas)

    Mod.2 #12 - Exercício 3: Mini sistema de cadastro
    Mod.2 #13 - Exercício 4: Calcular faixa etária de usuário
    Mod.2 #14 - Exercício 5: Informar conceito a partir de nota do usuário
    

    Fase 5 Total 3 aulas (00:14 horas)

    Mod.2 #15 - Bloco if: Verficação da existência de arquivos e diretórios
    Mod.2 #16 - Flags do bloco if (Parte 1): Condicionais com
    Mod.2 #17 - Flags do bloco if (Parte 2): Condicionais com
    

    Fase 6 Total 3 aulas (00:24 horas)

    Mod.2 #18 - Símbolos especiais no Shell: Condicionais de comandos
    Mod.2 #19 - Utilização do &&: Executar comandos se a condição é satisfeita
    Mod.2 #20 - Utilização do | |: Executar se a condição não for satisfeita
    

    Fase 7 Total 3 aulas (00:23 horas)

    Mod.2 #21 - Case: Como criar menu de opções para os seus scripts
    Mod.2 #22 - Parâmetros e flags: Passar parâmetros pela linha de comandos
    Mod.2 #23 - Menu de parâmetros: Refazer exemplo case com flags
    

    Fase 8 Total 3 aulas (00:16 horas)

    Mod.2 #24 - Laço de repetição for: Cadastro de emails de usuários
    Mod.2 #25 - Laço de repetição while: Refazer exemplo do laço for com while
    Mod.2 #26 - While read: Ler linhas de arquivo
    

    Fase 9 Total 4 aulas (00:21 horas)

    Mod.2 #27 - Exercício 6: Calcular média das notas do aluno com laço for
    Mod.2 #28 - Exercício 8: Encontrar o maior número com o laço while
    Mod.2 #29 - Exercício 9: Converter número em dia da semana com case
    Mod.2 #30 - Exercício 10: Somar lista de compras com while read linha
    

    Fase 10 Total 3 aulas (00:25 horas)

    Mod.2 #31 - Funções: Como definir funções em shell script
    Mod.2 #32 - Source: Como carregar bibliotecas de funções em shell script
    Mod.2 #33 - Exercício 11: Função de busca de produtos em shell script
    

    Fase 11 Total 4 aulas (00:38 horas)

    Mod.2 #34 (Parte 1) - While: Rodar comandos em loop infinito
    Mod.2 #34 (Parte 2) - While: Fazendo um contador em shell script
    Mod.2 #35 - Gerenciamento de processos: Executar script em background
    Mod.2 #36 - Jobs, fg, bg: Gerenciamento de processos em segundo plano
    

    Fase 12 Total 2 aulas (00:18 horas)

    Shell Script profissional Mod.2 #37 - Variáveis especiais do Shell (Parte 1)
    Shell Script profissional Mod.2 #38 - Variáveis especiais do Shell (Parte 2)
    
    Visit original content creator repository https://github.com/Geofisicando/Curso-Shell-Script-Profissional-mod-2
  • DbObjectExecutor

    Note This repository is developed for .netstandard2.0 with support .net5, net6, and .net7, and .net8.

    Name Details
    DbObjectExecutor NuGet Version Nuget Downloads
    DbObjectExecutor.Attribute NuGet Version Nuget Downloads
    DbObjectExecutor.Imp.EntityFramework NuGet Version Nuget Downloads

    The idea to implement the current repository started many years ago and is based on simple ideas and problems that must be solved.

    The first and the base problem is in the stored procedure or function execution. So practically in every ORM you can find, the method of execution/implementation and execution of an object (mentioned above) is quite difficult and does not allow their execution in a fairly simple and adequate way.

    Certainly, in case of the need to execute a stored procedure, the most frequent and perhaps the most convenient way was to switch/implement the execution to ADO.NET.

    So, to clarify what this repository represents: it is like a wrapper and a group of settings created around ADO.NET to be able to execute a stored procedure, a function, or a simple database query more efficiently with the simple possibility of adding parameters (input/output or return).

    Implementation of the current (logic) repository is separated into 3 components:

    • DbObjectExecutor -> contains the basic/core logic of execution and necessary functionalities;
    • DbObjectExecutor.Attribute -> contains the functionalities from DbObjectExecutor and additional permits decoration of a class and their properties with attributes that represent the name and settings of the future execution request;
    • DbObjectExecutor.Imp.EntityFramework -> contains the functionalities from DbObjectExecutor.Attribute and extensions for DbContext(EntityFramework).

    To understand more efficiently how you can use available functionalities please consult the using documentation/file.

    In case you wish to use it in your project, u can install the package from nuget.org or specify what version you want:

    Install-Package DbObjectExecutor -Version x.x.x.x
    Install-Package DbObjectExecutor.* -Version x.x.x.x

    Content

    1. USING
    2. CHANGELOG
    3. BRANCH-GUIDE
    Visit original content creator repository https://github.com/I-RzR-I/DbObjectExecutor
  • DualEditor

    ⚔️ DualEditor ⚔️

    If you just want to know how to install it ! ⬅️

    NOTE : if you want to help us and/or participate on improving this plugin don’t hesitate to open a PR 📥

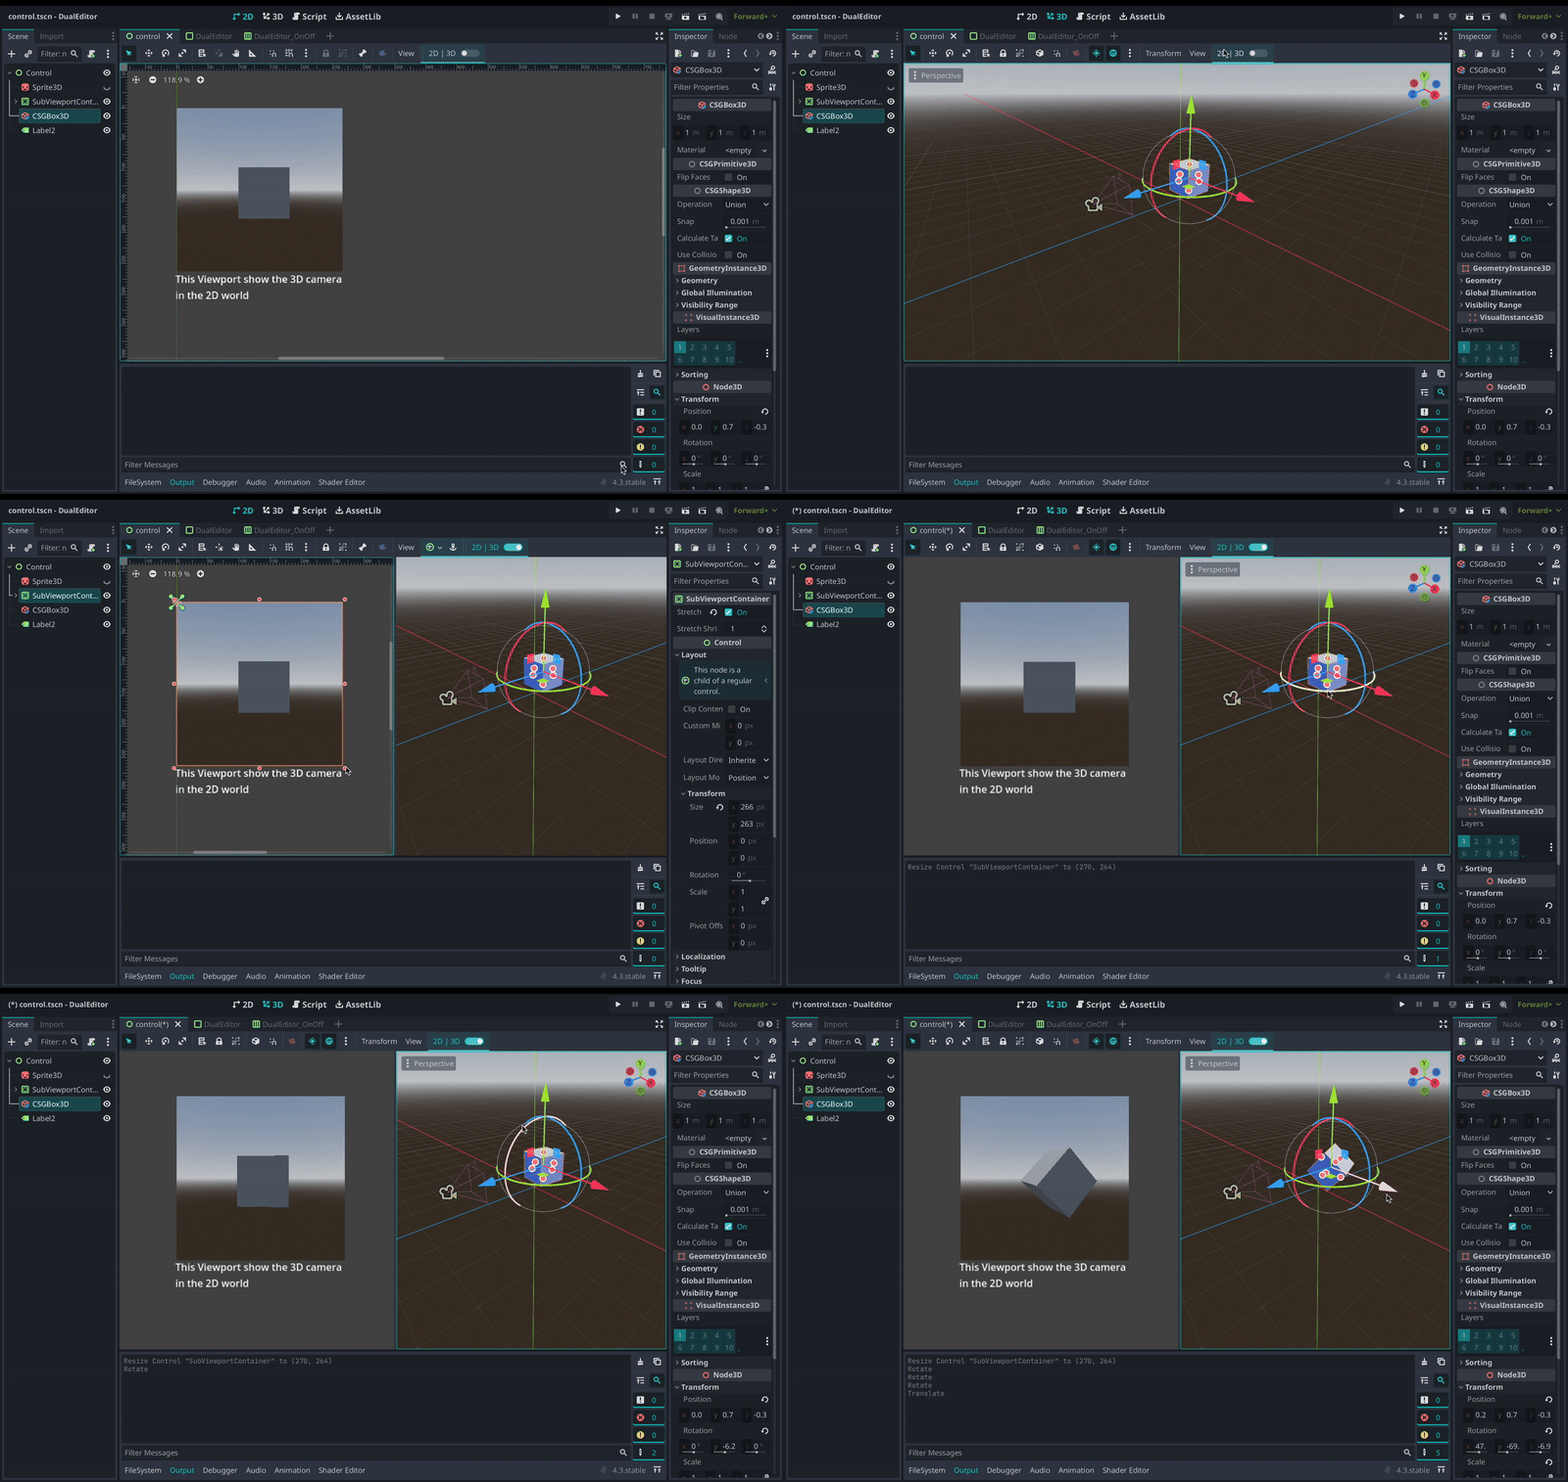
    A plugin for Godot Engine writted fully in GDScript that allow you to EDIT 2D and 3D editor while they are next to each other !

    📦 Features

    1 – Enable/Disable 2D/3D Dual Mode : This transform your 2D and 3D tab into a splitted view (2D on left and 3D on right)

    2 – Change on focus : To edit the editor your want ( 2D or 3D ) just move your mouse above the panel your want, it will automatically transform the other into a simple preview ( you can see the change on the 2D / 3D buttons on the Godot top editor bar )

    3 – Keep top bar functionnalities: When the focused editor change it will automatically switch the top bar functionality of the current editor ( the bar with snap grid options etc )

    📃 How to install

    1 – git clone https://github.com/Meta-Ben/DualEditor.git or download download the .zip and unzip it

    2 – Move the DualEditor folder into the addons folder of your Godot project, if you don’t have this folder you can just create one

    3 – In Godot, Under Projects -> Projects Settings -> Plugins, Enable the plugin named DualEditor

    4 – You should see this on/off switch appear :

    5 – When you need to enable the dual mode just enable it, and thats it ! 🎉

    Visit original content creator repository https://github.com/Meta-Ben/DualEditor
  • pip-outdated

    pip-outdated

    http://infobase.top/wp-content/uploads/2025/08/pip-outdated.svg

    Find outdated dependencies in your requirements.txt or setup.cfg file. Report missing/outdated/incompatible packages with table and colors.

    This tool compares the version number with the version specifier in requirements.txt or setup.cfg. If you just want to list all updatable package, simply use pip list --outdated command.

    Installation

    From pypi

    pip install pip-outdated
    

    Usage

    usage: pip-outdated [-h] [-v] [-q] [<file> [<file> ...]]
    
    Find outdated dependencies in your requirements.txt or setup.cfg file.
    
    positional arguments:
      <file>         Read dependencies from requirements files. This option
                     accepts glob pattern. (default: ['requirements.txt',
                     'setup.cfg'])
    
    optional arguments:
      -h, --help     show this help message and exit
      -v, --verbose  Print verbose information. (default: False)
      -q, --quiet    Don't return exit code 1 if not everything is up to date.
                     (default: False)
    

    Check multiple files e.g. test-requirements.txt and dev-requirements.txt:

    pip-outdated *-requirements.txt
    

    Check files under requirements folder:

    pip-outdated requirements/*.txt
    

    Todos

    • Add options to update the package?
    • Add options to update the requirements.txt/setup.cfg file?
    • Add options to list all packages? (e.g. -g, --global)

    Changelog

    • 0.8.0 (Aug 9, 2025)
      • Change: drop setuptools dependency, switch to configparse for reading setup.cfg.
    • 0.7.0 (Aug 13, 2024)
      • Change: ignore InvalidVersion error.
    • 0.6.0 (Jan 1, 2023)
      • Bump dependencies.
      • Drop cchardet.
      • Change: fetch package version from pip CLI, so we can get package version in venv.
    • 0.5.0 (Jan 12, 2022)
      • Bump dependencies.
      • Add: typehint.
    • 0.4.0 (Jan 30, 2020)
      • Breaking: bump Python to 3.7
      • Add: request in parallel.
      • Add: --quiet option.
    • 0.3.0 (Oct 13, 2019)
      • Breaking: set exit code to 1 if not all good.
      • Fix: don’t check prereleases.
      • Add: check setup_requires and extras_require in cfg files.
    • 0.2.0 (Feb 10, 2019)
    • 0.1.0 (May 12, 2018)
      • First release.
    Visit original content creator repository https://github.com/eight04/pip-outdated
  • examsite

    This project was bootstrapped with Create React App.

    Available Scripts

    In the project directory, you can run:

    npm start

    Runs the app in the development mode.
    Open http://localhost:3000 to view it in the browser.

    The page will reload if you make edits.
    You will also see any lint errors in the console.

    npm test

    Launches the test runner in the interactive watch mode.
    See the section about running tests for more information.

    npm run build

    Builds the app for production to the build folder.
    It correctly bundles React in production mode and optimizes the build for the best performance.

    The build is minified and the filenames include the hashes.
    Your app is ready to be deployed!

    See the section about deployment for more information.

    npm run eject

    Note: this is a one-way operation. Once you eject, you can’t go back!

    If you aren’t satisfied with the build tool and configuration choices, you can eject at any time. This command will remove the single build dependency from your project.

    Instead, it will copy all the configuration files and the transitive dependencies (webpack, Babel, ESLint, etc) right into your project so you have full control over them. All of the commands except eject will still work, but they will point to the copied scripts so you can tweak them. At this point you’re on your own.

    You don’t have to ever use eject. The curated feature set is suitable for small and middle deployments, and you shouldn’t feel obligated to use this feature. However we understand that this tool wouldn’t be useful if you couldn’t customize it when you are ready for it.

    Learn More

    You can learn more in the Create React App documentation.

    To learn React, check out the React documentation.

    Code Splitting

    This section has moved here: https://facebook.github.io/create-react-app/docs/code-splitting

    Analyzing the Bundle Size

    This section has moved here: https://facebook.github.io/create-react-app/docs/analyzing-the-bundle-size

    Making a Progressive Web App

    This section has moved here: https://facebook.github.io/create-react-app/docs/making-a-progressive-web-app

    Advanced Configuration

    This section has moved here: https://facebook.github.io/create-react-app/docs/advanced-configuration

    Deployment

    This section has moved here: https://facebook.github.io/create-react-app/docs/deployment

    npm run build fails to minify

    This section has moved here: https://facebook.github.io/create-react-app/docs/troubleshooting#npm-run-build-fails-to-minify

    Visit original content creator repository
    https://github.com/Narmadhu/examsite

  • Chatbot-Using-Deep-Learning

    Chatbot-Using-Deep-Learning

    We use Keras, Tensorflow and NLTK to recognize the user’s intent and generate the appropriate response.

    Getting Started (Console Chat):

    Create a virtual environment and install the requirements:
    pip install -r requirements.txt

    Train the model:

    • Run all the code cells in the notebook ‘trainer.ipynb’.

    Run the application:
    python chat.py

    Intents Dataset:

    1. Greeting: greetings to the user.

    2. GoodBye: goodbyes to the user.

    3. ThankYou: appreciation messages to the user.

    4. Success: response to a successful action relayed by the user.

    5. About: replies to messages about the chatbot.

    6. Name: replies to messages about the chatbot’s name.

    7. Help: responses to a user’s help request or request for more information on an issue.

    8. Assistance: replies to a user’s request for assistance.

    9. CreateAccount: helps the user with creating an account.

    10. Login: messages helping the user login.

    11. Password: assistance with resetting a forgetten password.

    12. EmailChange: helps a user with email address changes.

    13. EmailSupport: gives the user an email for customer support.

    14. Payout: provides information about vendor payouts.

    15. Complaint: gives th user a place to complain.

    Visit original content creator repository
    https://github.com/copev313/Chatbot-Using-Deep-Learning

  • pastream

    GIL-less Portaudio Streams for Python

    pastream builds on top of portaudio and the excellent sounddevice python bindings to provide some more advanced functionality right out of the box. Note that in addition to the pastream library, pastream includes a command line application for playing and recording audio files.

    Documentation:
    http://pastream.readthedocs.io/
    Source code repository and issue tracker:
    http://github.com/tgarc/pastream/

    Features

    GIL-less Audio Callbacks
    Having the portaudio callback implemented in C means audio interrupts can be serviced quickly and reliably without ever needing to acquire the Python Global Interpreter Lock (GIL). This is crucial when working with libraries like Pillow which may greedily grab and hold the GIL subsequently causing audio overruns/underruns.
    Input Stream iterators

    Efficiently retrieve live audio capture data through an iterable. As simple as:

    import pastream as ps
    for chunk in ps.chunks():
        process(chunk)

    See pastream.chunks and pastream.InputStream.chunks method.

    Built-in support for working with SoundFiles and numpy ndarrays
    Seamless support for playback/recording of numpy ndarrays, generic buffer types, and SoundFiles.
    Reader/Writer Threads
    pastream simplifies the process of implementing stream reader and writer threads to manipulate and/or generate data in the background while leaving the main thread free for higher level management tasks.

    External Dependencies

    There are a few compiled libraries pastream requires which may need to be installed separately depending on your operating system. Windows users are luckiest, they can skip this section entirely.

    libffi (Linux/Unix/MacOSX):

    Under Linux/Unix/MacOSX platforms you’ll need to install the ffi library. (For Windows users, ffi is already included with the python cffi package.) libffi is available through most package managers:

    $ yum install libffi-devel # Red-hat/CentOS Linux
    $ apt-get install libffi-dev # Ubuntu/debian derivatives
    $ brew install libffi # Homebrew on OSX
    

    More information on installing libffi is available in the cffi documentation here.

    PortAudio and libsndfile (Linux/Unix):
    Linux and Unix users will also need to install a recent version of the PortAudio and libsndfile libraries. (For Windows and OSX, the sounddevice and soundfile python packages include prebuilt versions for you.) You can either install the latest available from your package manager (e.g. apt-get install libportaudio2 libsndfile for debian/raspbian) or install the latest stable build from the package website (Recommended).

    Installation

    Once the above dependencies have been resolved, you can install pastream using pip:

    $ pip install pastream
    

    Building From Source

    Clone pastream with the --recursive flag:

    $ git clone --recursive http://github.com/tgarc/pastream
    

    Or, if you already have a checkout:

    $ cd <path/to/checkout>
    $ git submodule update --init
    

    Finally, do a pip install from your local working copy:

    $ pip install <path/to/checkout>
    

    Building Documentation

    Documentation for pastream can be easily generated in a wide variety of formats using Sphinx. Just follow the steps below.

    Checkout the repository and cd into it:

    $ git clone http://github.com/tgarc/pastream
    $ cd pastream
    

    Install documentation dependencies using requirements file:

    $ pip install -r docs/requirements.txt
    

    Then use the included Makefile/make.bat to generate documentation. (Here we output to the html format):

    $ cd docs
    $ make html
    

    Examples

    Record one second of audio to memory, then play it back:

    import pastream as ps
    
    # Use *with* statements to auto-close the stream
    with ps.DuplexStream() as stream:
        out = stream.record(int(stream.samplerate), blocking=True)
        stream.play(out, blocking=True)

    Playback 10 seconds of a file, adding zero padding if the file is shorter, and record the result to memory:

    import pastream as ps, soundfile as sf
    
    with sf.SoundFile('my-file.wav') as infile, ps.DuplexStream.from_file(infile) as stream:
        out = stream.playrec(infile, frames=10 * int(stream.samplerate), pad=-1, blocking=True)

    Grab (real) frequency transformed live audio stream with 50% overlap:

    import pastream as ps, numpy as np
    
    chunksize = 1024
    window = np.hanning(chunksize)
    for x_l in ps.chunks(chunksize, overlap=chunksize//2, channels=1):
        X_l = np.fft.rfft(x_l * window)

    Generate a pure tone on-the-fly

    import time
    import pastream as ps
    import numpy as np
    
    # A simple tone generator
    def tone_generator(stream, buffer, f, loop=False):
        fs = stream.samplerate
    
        # Create a time index
        t = 2*np.pi*f*np.arange(len(buffer), dtype=stream.dtype) / fs
    
        # Loop until the stream stops
        while not stream.finished:
            frames = buffer.write_available
            if not frames:
                time.sleep(0.010)
                continue
    
            # Get the write buffers directly to avoid making any extra copies
            frames, part1, part2 = buffer.get_write_buffers(frames)
    
            out = np.frombuffer(part1, dtype=stream.dtype)
            np.sin(t[:len(out)], out=out)
    
            if len(part2):
                # part2 will be nonempty whenever we wrap around the end of the ring buffer
                out = np.frombuffer(part2, dtype=stream.dtype)
                np.sin(t[:len(out)], out=out)
    
            # flag that we've added data to the buffer
            buffer.advance_write_index(frames)
    
            # advance the time index
            t += 2*np.pi*f*frames / fs
    
    with ps.OutputStream(channels=1) as stream:
        # Set our tone generator as the source and pass along the frequency
        freq = 1000
        stream.set_source(tone_generator, args=(freq,))
    
        # Busy-wait to allow for keyboard interrupt
        stream.start()
        while stream.active:
            time.sleep(0.1)

    See also the included examples under /examples.

    Command Line Application

    Once installed, the pastream application should be callable from your command line. If you’re familiar with SoX you’ll notice that some of the command line syntax is quite similar. Here are a few examples to help get you started.

    Display the help file:

    $ pastream -h
    

    List available audio devices:

    $ pastream -l
    

    Simultaneous play and record from the default audio device:

    $ pastream input.wav output.wav
    

    Pipe input from sox using the AU format and record the playback:

    $ sox -n -t au - synth sine 440 | pastream - output.wav
    

    Play a RAW file:

    $ pastream -c1 -r48k -e=pcm_16 output.raw
    

    Record 10 minutes of audio at 48kHz:

    $ pastream null output.wav -r48k -d10:00
    
    Visit original content creator repository https://github.com/tgarc/pastream
  • fundgrube-notifier

    Fundgrube Notifier

    This project notifies you about current offers from the German electronics retail chains Saturn and MediaMarkt in their Fundgrube, that match specific conditions you can define.

    Setup

    Before you start make sure python 3.9 (or higher) and poetry are installed on your machine.

    First, clone the project, navigate to its root directory, and install the dependencies (this automatically creates a virtual environment):

    poetry install

    Next, rename the file sample_products.json in the data directory to products.json and fill it as specified in the Options section.

    Email notifications

    If you want to get email notifications, the easiest way is to use a Google account (for Gmail)
    with 2FA enabled.
    In your account you have to generate an app password for Gmail.
    While creating the password select “Mail” as app and “Other” as device (select as custom name you see fit, e.g., “Raspberry Pi”).
    We need to use app passwords (which in turn require 2FA) due to a policy change in mid-2022.
    Lastly, you have to rename the sample.env to .env and fill it as follows:

    • MAIL_SENDER The gmail address you want to send the emails from.
    • MAIL_PASSWORD The 16-digit app password you generated.
    • MAIL_RECEIVER If you want to receive the emails on another address, set it here. (Optional)

    If you do not want to use Gmail you also have to specify:

    • SMTP_SERVER The SMTP server of your email provider.
    • SMTP_PORT The corresponding SMTP port.

    Be aware though, that non-Gmail approaches might run into issues with 2FA etc. and were not tested.

    Usage

    Once everything is set up, you can run the script with

    poetry run python fundgrube_notifier.py

    Cron job

    You can also set up a cron job (or something similar) to automatically execute the script every hour.
    For this, open the cron tab with

    crontab -e

    and then add the following line to configure the cron job (replace <path> with the path to this project’s root directory):

    5 8-23 * * * cd <path>/fundgrube-notifier && poetry run python fundgrube_notifier.py

    Make sure that cron has access to the correct $PATH (e.g., for poetry), by copying the following line above the definition of the cron job (replace <user> with your device’s username):

    PATH=/usr/local/sbin:/usr/local/bin:/sbin:/bin:/usr/sbin:/usr/bin:/home/<user>/.local/bin

    See this Stack Overflow post for more details regarding cron and $PATH.

    Options

    Entries in the products.json file are created in JSON format and every JSON object can have the following attributes to filter the available articles:

    • include: A list of terms that must appear in the name of the article (case-insensitive; AND operator). (Mandatory).
      • Also accepts lists of terms instead of terms, of which only one term has to match (OR operator; see example).
    • exclude: A list of terms, that must not appear in the name of the article (case-insensitive). (Optional)
    • price: Articles with a higher price are ignored. (Optional)
    • store: A list of terms, that must appear in the name of the store (case-insensitive). (Optional)

    When choosing the terms for include, exclude, and store, remember that only simple string matching is done, so sometimes only using substrings might be beneficial.

    Example

    [
    {
    “include”: [sony, tv],
    “exclude”: [lcd]
    },
    {
    “include”: [playstation],
    “price”: 20,
    “store”: [köln]
    }
    ]

    Fundgrube

    The Fundgrube has special offers that are usually very limited in numbers and can be found here:

    Data

    This project is using already preprocessed data, which is crawled hourly by a script
    from Barney at mydealz:

    More info:
    https://www.mydealz.de/diskussion/die-saturn-fundgrube-ist-da-einzelstucke-in-einzelnen-markten-gunstig-kaufen-1764598

    Visit original content creator repository
    https://github.com/trannel/fundgrube-notifier

  • keyvault-acmebot

    Key Vault Acmebot

    Automated ACME SSL/TLS certificates issuer for Azure Key Vault (App Service / Container Apps / App Gateway / Front Door / CDN / others)

    Build Release Stargazers Forks License Terraform
    Last commit Documentation Discussions

    Motivation

    We have begun to address the following requirements:

    • Securely store SSL/TLS certificates with Azure Key Vault
    • Centralize management of large numbers of certificates with a single Key Vault
    • Easy to deploy and configure solution
    • Highly reliable implementation
    • Easy to monitor (Application Insights, Webhook)

    Key Vault Acmebot provides secure and centralized management of ACME certificates.

    Feature Support

    • Issue certificates for Zone Apex, Wildcard and SANs (multiple domains)
    • Dedicated dashboard for easy certificate management
    • Automated certificate renewal
    • Support for ACME v2 compliant Certification Authorities
    • Certificates can be used with many Azure services
      • Azure App Services (Web Apps / Functions / Containers)
      • Azure Container Apps (Include custom DNS suffix)
      • Front Door (Standard / Premium)
      • Application Gateway v2
      • API Management
      • SignalR Service (Premium)
      • Virtual Machine

    Deployment

    Azure (Public) Azure China Azure Government

    Learn more at https://github.com/shibayan/keyvault-acmebot/wiki/Getting-Started

    Sponsors

    ZEN Architects

    Thank you for your support of our development. Interested in special support? Become a Sponsor

    Thanks

    License

    This project is licensed under the Apache License 2.0

    Visit original content creator repository https://github.com/shibayan/keyvault-acmebot